- All
- Product Name
- Product Keyword
- Product Model
- Product Summary
- Product Description
- Multi Field Search
 |


| Quantity: | |
|---|---|
TL061021
TL
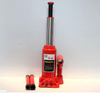
A hydraulic bottle jack with a safety valve is a mechanical device used for lifting heavy objects by applying hydraulic pressure. It consists of a cylindrical body (resembling a bottle) with a piston inside, connected to a hydraulic pump. The safety valve is a crucial feature designed to prevent overloading and ensure safe operation during lifting tasks.
What does a safety valve do in a bottle jack?
If the load is too heavy, the jack's safety valves will engage, which will cause the jack to stop lifting.
Hydraulic bottle jack Features
High Lifting Capacity: Hydraulic bottle jacks are designed to handle substantial weight loads, making them suitable for various industrial, automotive, and construction applications.
Compact Design: The bottle-shaped body of the jack allows for a compact and space-efficient design, making it easy to store and transport.
Hydraulic Mechanism:These jacks utilize hydraulic pressure to lift objects, providing smooth and controlled lifting motion with minimal effort from the operator.
Safety Valve: The integrated safety valve is a critical feature that prevents overloading. When the load surpasses the jack's capacity, the safety valve releases excess pressure, preventing potential damage and accidents.
Stebility and support: Hydraulic bottle jacks typically have a stable base and a wide saddle area that provides reliable support for the lifted object, minimizing the risk of tipping or instability.
Adjustable Height: Most hydraulic bottle jacks offer adjustable lifting heights through the extension of the hydraulic piston, allowing for flexibility in lifting various objects to different heights.
Easy to use: The hydraulic mechanism reduces the physical effort required to lift heavy objects.
Portabilty: Their compact design and relatively lightweight nature compared to other lifting equipment make hydraulic bottle jacks portable and easy to move between job sites.
Low profile-high lift hydraulic bottle jack


| Capacity | Min H. | Lift H. | Adjust H. | Max H. | Weight |
| T | mm | mm | mm | mm | kg |
| 2 | 148 | 80 | 50 | 278 | 2.1 |
| 3 | 180 | 110 | 60 | 350 | 2.9 |
| 4 | 180 | 110 | 60 | 350 | 2.9 |
| 5 | 185 | 110 | 60 | 355 | 3.6 |
| 6 | 185 | 110 | 60 | 355 | 3.6 |
| 8 | 200 | 125 | 60 | 385 | 4.8 |
| 10 | 200 | 125 | 60 | 385 | 5.2 |
| 12 | 210 | 130 | 60 | 400 | 6.3 |
| 15 | 225 | 135 | 60 | 420 | 7.3 |
| 16 | 225 | 135 | 60 | 420 | 7.3 |
| 20 | 235 | 145 | 60 | 440 | 9.6 |
| 25 | 255 | 150 | 0 | 405 | 12 |
| 30 | 255 | 150 | 0 | 405 | 12 |
| 32 | 255 | 150 | 0 | 405 | 12 |
| 50 | 255 | 150 | 0 | 405 | 18.5 |
| 100 | 335 | 180 | 0 | 515 | 66 |
Hydraulic Bottle jack Use Instrcution
Before Use:
1.Do not use blocks on or under the jack.
2.Check before each use for abnormal conditions such as cracked welds, leaks, damaged, loose or missing parts.
3.Inspect the jack immediately if the lift is believed to have been subjected to an abnormal load or shock.
4.If the jack is found to be damaged, it should be removed from service until properly repaired.
Use Instruction:
1.Insert the jack handle into the hole of the handle socket.
2.Make sure that the saddle is correctly positioned. To prevent damage to the jack, do not move the jack while the handle is intact in the socket.
3.To raise load, use one hand to hold the front part of the handle and use the other hand to turn at the rear and of the handle clockwise.
4.To lower load, use one hand to hold the front part of the handle and use the other hand to turn at the rear and of the handle counterclockwise slowly.
A hydraulic bottle jack with a safety valve is a mechanical device used for lifting heavy objects by applying hydraulic pressure. It consists of a cylindrical body (resembling a bottle) with a piston inside, connected to a hydraulic pump. The safety valve is a crucial feature designed to prevent overloading and ensure safe operation during lifting tasks.
What does a safety valve do in a bottle jack?
If the load is too heavy, the jack's safety valves will engage, which will cause the jack to stop lifting.
Hydraulic bottle jack Features
High Lifting Capacity: Hydraulic bottle jacks are designed to handle substantial weight loads, making them suitable for various industrial, automotive, and construction applications.
Compact Design: The bottle-shaped body of the jack allows for a compact and space-efficient design, making it easy to store and transport.
Hydraulic Mechanism:These jacks utilize hydraulic pressure to lift objects, providing smooth and controlled lifting motion with minimal effort from the operator.
Safety Valve: The integrated safety valve is a critical feature that prevents overloading. When the load surpasses the jack's capacity, the safety valve releases excess pressure, preventing potential damage and accidents.
Stebility and support: Hydraulic bottle jacks typically have a stable base and a wide saddle area that provides reliable support for the lifted object, minimizing the risk of tipping or instability.
Adjustable Height: Most hydraulic bottle jacks offer adjustable lifting heights through the extension of the hydraulic piston, allowing for flexibility in lifting various objects to different heights.
Easy to use: The hydraulic mechanism reduces the physical effort required to lift heavy objects.
Portabilty: Their compact design and relatively lightweight nature compared to other lifting equipment make hydraulic bottle jacks portable and easy to move between job sites.
Low profile-high lift hydraulic bottle jack
| Capacity | Min H. | Lift H. | Adjust H. | Max H. | Weight |
| T | mm | mm | mm | mm | kg |
| 2 | 148 | 80 | 50 | 278 | 2.1 |
| 3 | 180 | 110 | 60 | 350 | 2.9 |
| 4 | 180 | 110 | 60 | 350 | 2.9 |
| 5 | 185 | 110 | 60 | 355 | 3.6 |
| 6 | 185 | 110 | 60 | 355 | 3.6 |
| 8 | 200 | 125 | 60 | 385 | 4.8 |
| 10 | 200 | 125 | 60 | 385 | 5.2 |
| 12 | 210 | 130 | 60 | 400 | 6.3 |
| 15 | 225 | 135 | 60 | 420 | 7.3 |
| 16 | 225 | 135 | 60 | 420 | 7.3 |
| 20 | 235 | 145 | 60 | 440 | 9.6 |
| 25 | 255 | 150 | 0 | 405 | 12 |
| 30 | 255 | 150 | 0 | 405 | 12 |
| 32 | 255 | 150 | 0 | 405 | 12 |
| 50 | 255 | 150 | 0 | 405 | 18.5 |
| 100 | 335 | 180 | 0 | 515 | 66 |
Hydraulic Bottle jack Use Instrcution
Before Use:
1.Do not use blocks on or under the jack.
2.Check before each use for abnormal conditions such as cracked welds, leaks, damaged, loose or missing parts.
3.Inspect the jack immediately if the lift is believed to have been subjected to an abnormal load or shock.
4.If the jack is found to be damaged, it should be removed from service until properly repaired.
Use Instruction:
1.Insert the jack handle into the hole of the handle socket.
2.Make sure that the saddle is correctly positioned. To prevent damage to the jack, do not move the jack while the handle is intact in the socket.
3.To raise load, use one hand to hold the front part of the handle and use the other hand to turn at the rear and of the handle clockwise.
4.To lower load, use one hand to hold the front part of the handle and use the other hand to turn at the rear and of the handle counterclockwise slowly.


